|
The folks at Facebook recently enhanced their Comments Social
Plugin which allows you to integrate Facebook comments onto web
pages on your website.
This tutorial walks you through the process of adding the
Comments Plugin to your website. Facebook, of course,
offers instructions as well, but I found them to be somewhat
cryptic in places and there are certain file naming conventions
that must be followed, or the comment moderation capability
won't work.
This tutorial assumes you want to deploy and manage the
Comments moderation settings for multiple pages on your website.
To accomplish this, Facebook recommends using an App ID :
If your site has many comments boxes, we
strongly recommend you specify a Facebook app id as the
administrator (all administrators of the app will be able to
moderate comments). Doing this enables a moderator interface on
Facebook where comments from all plugins administered by your
app id can be easily moderated together.
If this is not the case, and you are adding only a
single page with the Comments Plugin, then skip to
Step 13 and insert this meta code instead:
<meta
property="fb:admins"
content="{YOUR_FACEBOOK_USER_ID}"/>
|
To get started, and get an App ID for your Comments
moderation, you need to install the Facebook Developers tool.
Installing the Facebook Developers
Tool
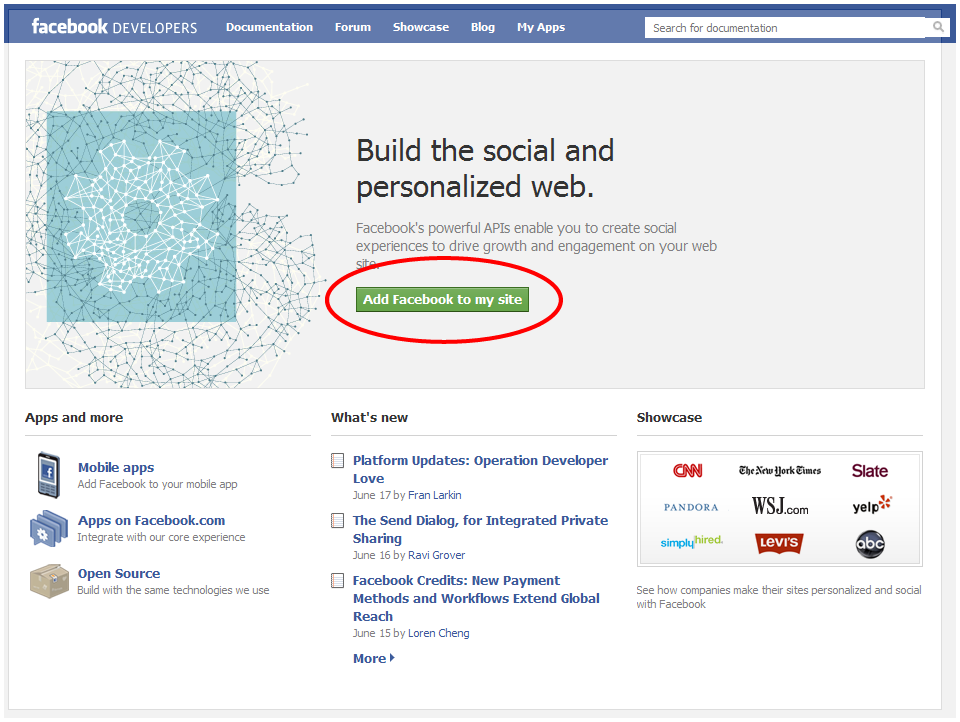
1) go to
https://developers.facebook.com/ and select "Add Facebook to my Site"
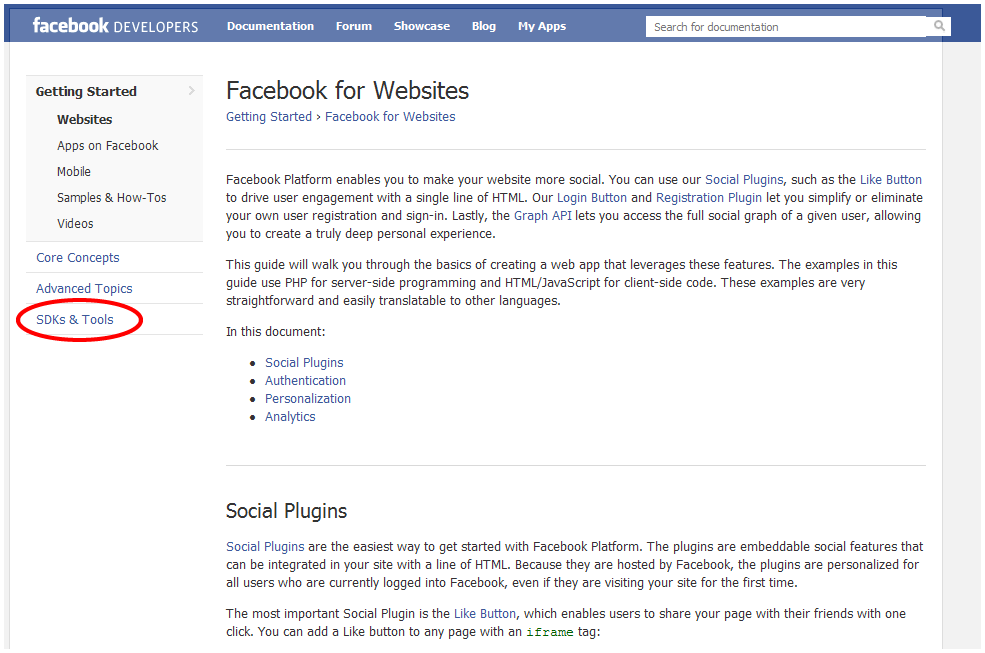
2) From here, select "SDKs & Tools" from the options on the
left.
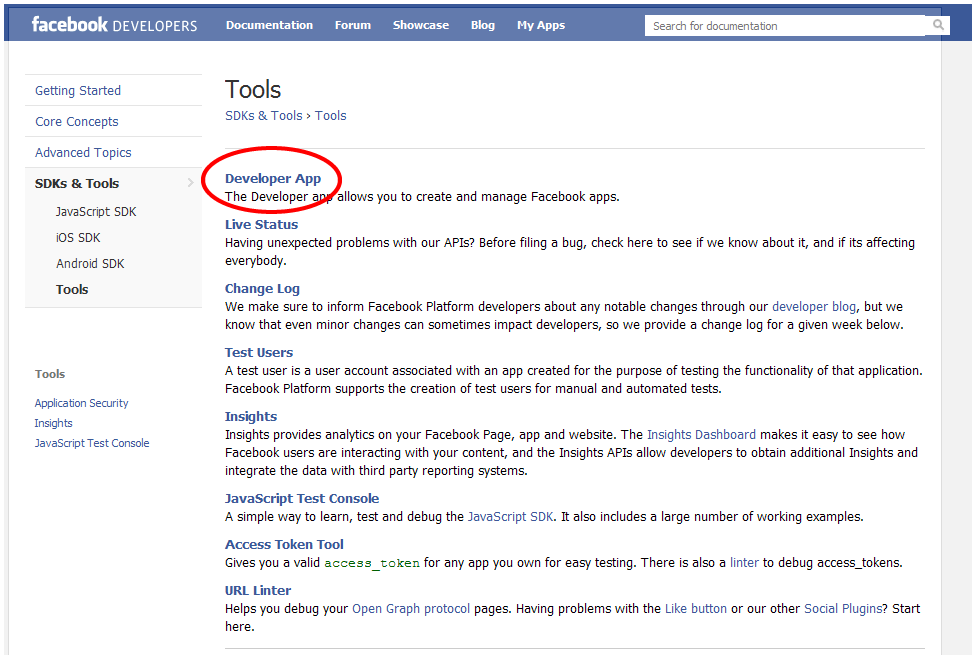
3) Now, select "Tools"

4) Next, select "Developer App"
5) Once you select "Developer App," Facebook will prompt you to
log in, if you have not already done so
6) Facebook will install the Developer App to your account. From
the Developer App, under "My Apps," you can then select
7) Create your Application, by naming it and Agreeing to the
Facebook terms.
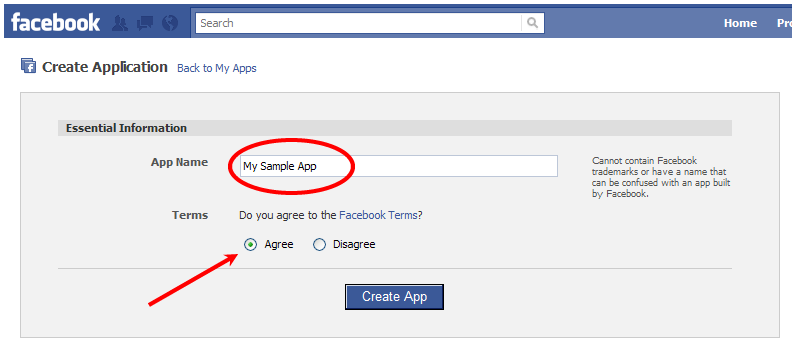
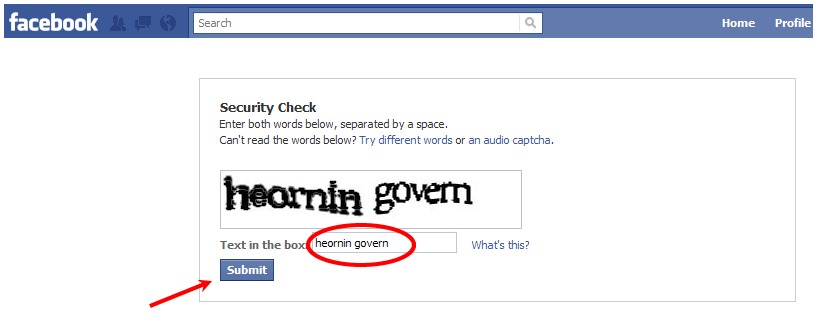
8) Now enter the text to pass the security check, and click
"submit."
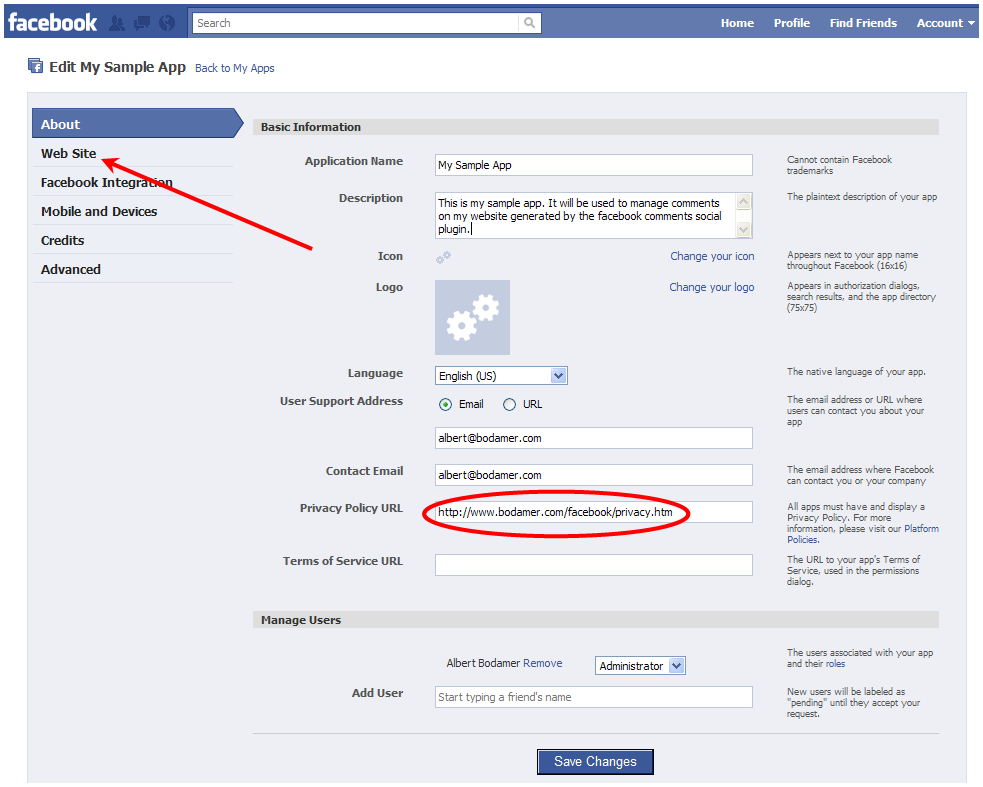
9) Now you can manage your App. Enter a brief description, of
your App, associate icons & logos, if you like. You are required
to enter a URL that points to your company's privacy policy.
Once you've done this, click on "Web Site."
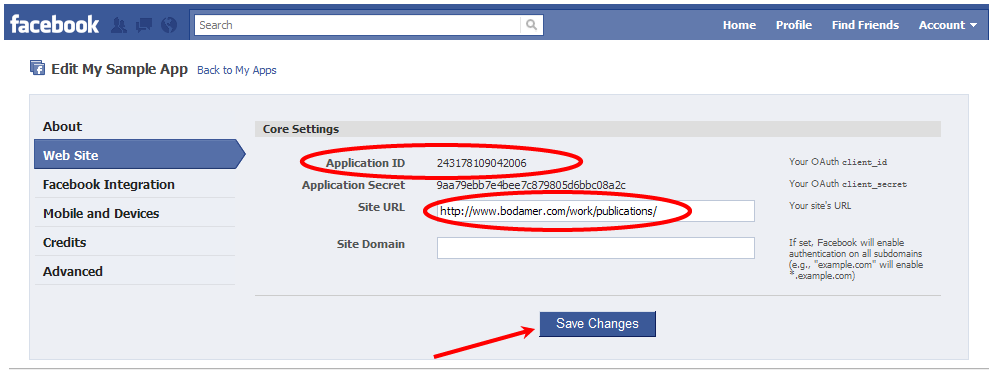
10) On the Web Site screen, enter the URL directory of your
website where the pages will reside that will use the Comments
Social Plugin. Note that the URL must end with a "/" Note your
Application ID, you'll be using it later to manage your
comments. Click on "Save Changes."
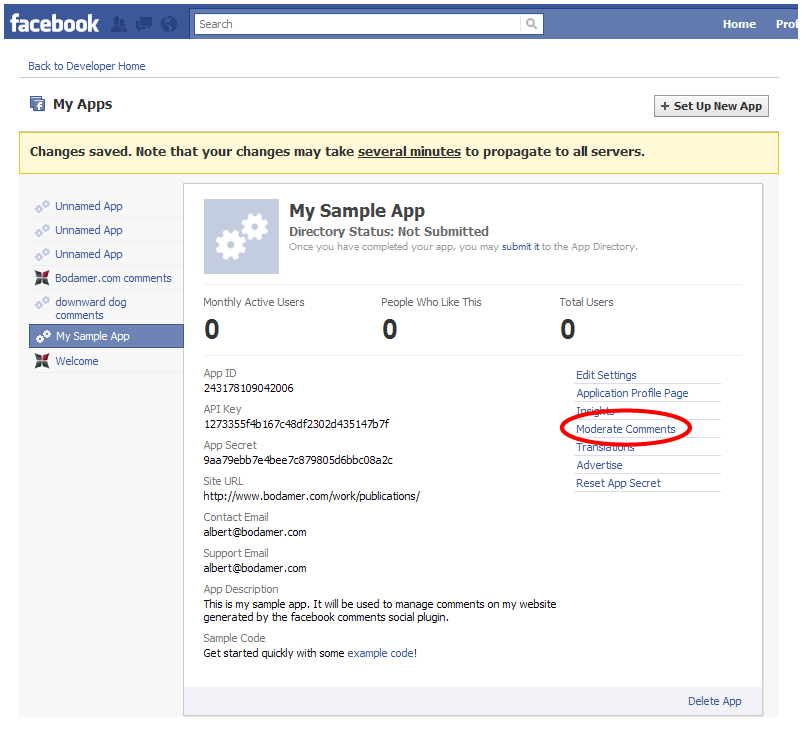
11) Once you save your App, a summary screen shows you the
App ID and offers various tools for the App, including the
ability to Moderate Comments, which we'll be using later.
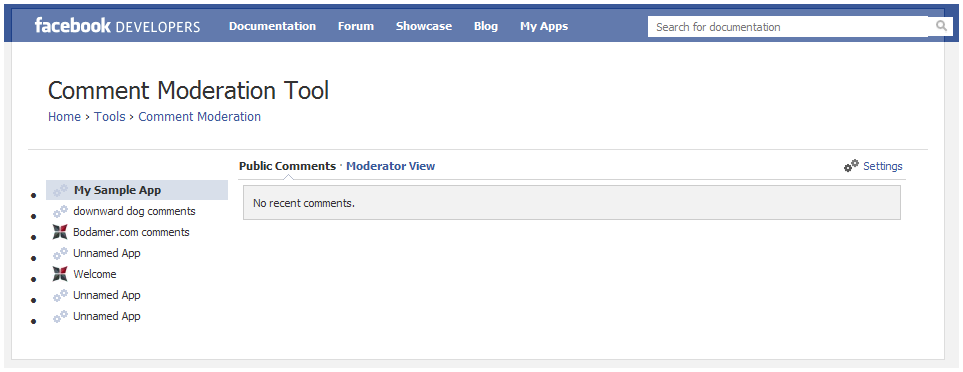
12) Here's what the comment moderation screen looks like.
In editor's mode, open the web page
on your website to which you will be
adding the comments plugin. As in the example below, insert the highlighted meta code. Be
sure to replace the sample app_id content with the App ID
for the app you created above.
<html>
<head>
<LINK REL="SHORTCUT ICON"
HREF="https://www.bodamer.com/bodamericon.ico">
<title>Facebook Social Plugins:
Add Comments to your Website.
by: Albert Bodamer.
www.bodamer.com</title>
<meta
http-equiv="Content-Language"
content="en-us">
<meta http-equiv="Content-Type"
content="text/html; charset=windows-1252">
<meta name="keywords"
content="Bodamer, consulting,
telecommunications, marketing,
management, training, business
development, web, wireless,
cellular, 700 MHz, PCS, CLEC,
ILEC">
<meta
http-equiv="Content-Style-Type"
content="text/css">
<meta
property="fb:app_id"
content="243178109042006"/>
<LINK
HREF="https://www.bodamer.com/style.css"
TYPE="text/css" REL="stylesheet">
</head>
<body>
Body content here.
</body>
</html> |
You are now ready to add the comments functionality to your
site.
Adding the Facebook Comments Social
Plugin
14) Go to:
https://developers.facebook.com/docs/plugins/ and click on "Comments"
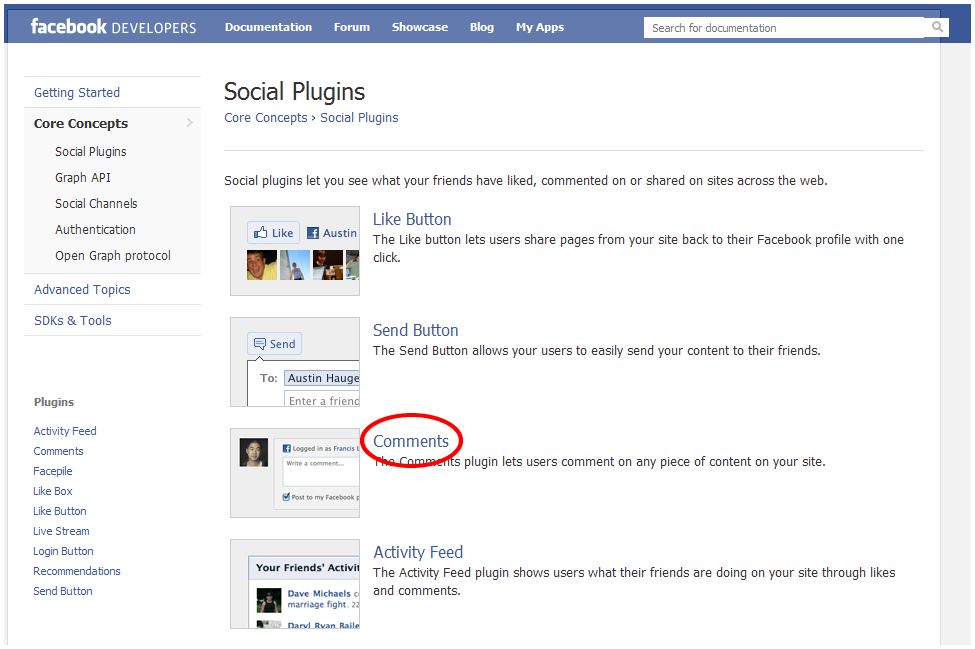
15) Enter the URL for the web page to which you will be adding
Comments functionality. Remember that this web page must be
contained in the directory you entered in step 10 above.
The little secret it took me a good while to unravel is that
for the moderation capability to work, the web page name cannot
contain spaces or under-scores. I had to rename all my web
pages to conform to this unspecified requirement. Next, select the number of posts you wish to allow to appear by
default as well as the width (in pixels) and the color scheme.
Once you're satisfied with the appearance, click on "Get Code."

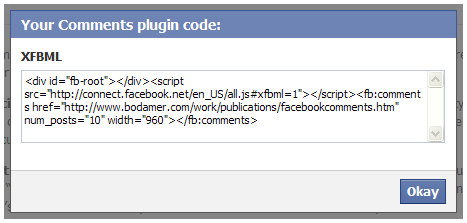
16) When you click on the "Get Code" button, a window
containing the XFBML code pops up. Cut & paste the code into
your web page where you want the comments section to appear.
17) Save and publish your web page. Repeat
steps 14-16 for each web page in which you want to include
Facebook comments.
18) Since you are an administrator of the App
ID you created above, your comments section should appear as
follows when you browse to the web page:

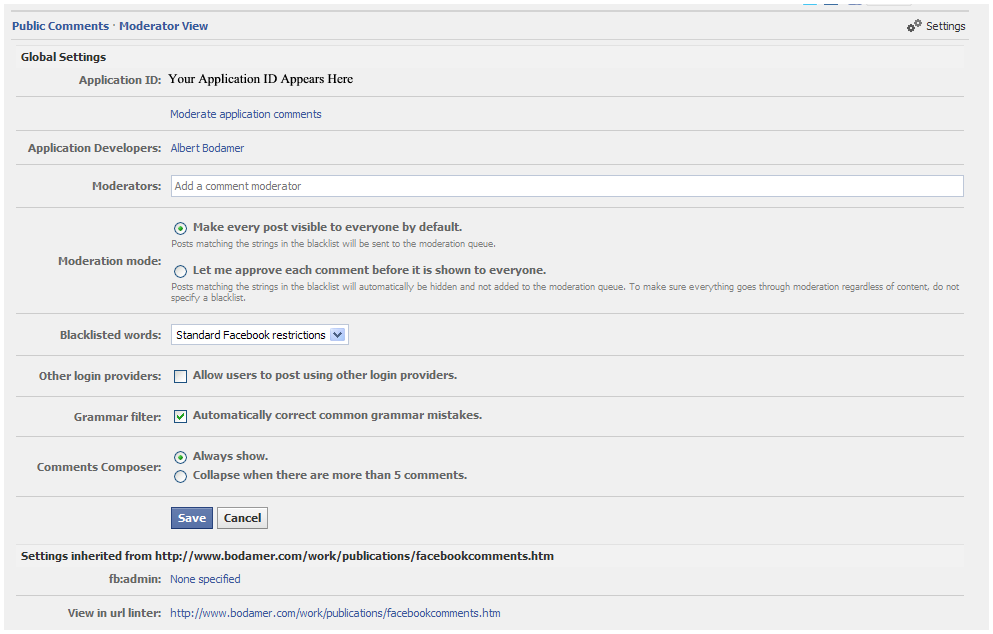
19) You can manage your moderation settings
right from your web page by clicking on "Settings" in the upper
right of the plugin. From this screen you can control the
moderation settings for all pages you set up where you identify
the App ID in the meta code as in Step 13.
You can manage individual comments, and establish the Moderation
Mode. You can also employ blacklisted words and other options as
detailed below.
If you found this tutorial helpful, please feel free to go ahead
and "Like" it:
|
